Background
By default – Prime Mover 2.0.0+ automatic backup PRO feature supports the following backup schedules:
- Once daily
- Twice weekly
- Once weekly
- Twice monthly
- Once monthly
These default schedules are designed to be sufficient for most auto-backup implementations. However, this short tutorial illustrates the solution for those who need a custom backup schedule.
Formulate custom backup schedule parameters.
The first step is formulating your custom backup schedule parameters using a constant. This needs to be added to wp-config.php. For example, the code below will add two new custom backup schedules: once every three months and once every six months.
define('PRIME_MOVER_AUTOBACKUP_CUSTOM_SCHEDULES', json_encode (
   [
       'prime_mover_every_three_months' => [
           'interval' => 7776000,
           'display'  => 'Once in 3 months'
       ],

       'prime_mover_every_six_months' => [
           'interval' => 15552000,
           'display'  => 'Once in 6 months'
       ]
   ]
   )
);
Some notes of the above example:
PRIME_MOVER_AUTOBACKUP_CUSTOM_SCHEDULES– It is the constant name. Please do not change this.- Only change these lines to add your custom backup schedules:
 'prime_mover_every_three_months' => [
           'interval' => 7776000,
           'display'  => 'Once in 3 months'
       ],

 'prime_mover_every_six_months' => [
           'interval' => 15552000,
           'display'  => 'Once in 6 months'
       ]
WHERE:
prime_mover_every_three_months= the identifier of your new custom backup schedule. Make this name user-friendly for easy identification. It is recommended to use the naming convention:prime_mover_every_{YOUR_SCHEDULE_SLUG}interval– your backup schedule in seconds. For example, in 3 months, the total number of seconds is 7776000. This is because, in approximately one month, the total number of seconds is 2592000. Multiply this by 3 (for 3 months), the total seconds in months.displayThis user-friendly name will be displayed in your Prime Mover automatic backup custom schedule settings. For maximum compatibility, it is recommended that you use English name descriptions. For now, this is not translatable.
Case example: Add a new custom backup schedule – “Once in three weeks.”
Let’s use an example for clarification purposes. Suppose you want to run an automatic backup once every three weeks. However, this schedule is not included in the Prime Mover default backup schedules. You need to add this custom schedule.
First, let’s compute the total number of seconds in 3 weeks. In addition, it is known that one day has 86400 seconds. Therefore, the total number of seconds in 3 weeks (which has 21 days on it) will be:
Total number of seconds = 21 x 86400 = 1814400
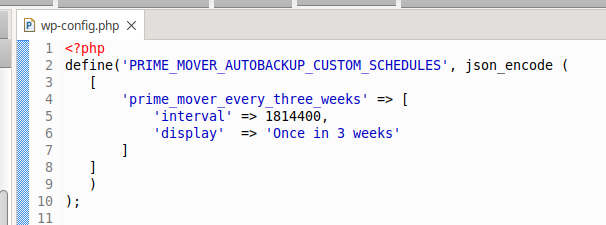
Next, we formulate the custom backup schedule parameters and define all needed parameter values:
define('PRIME_MOVER_AUTOBACKUP_CUSTOM_SCHEDULES', json_encode (
   [
       'prime_mover_every_three_weeks' => [
           'interval' => 1814400,
           'display'  => 'Once in 3 weeks'
       ]
   ]
   )
);
It’s done! The only thing left to do is add it to wp-config.php. This is how it looks if it’s added to wp-config.php. For example, it is added to the topmost part of the configuration file for visibility.
Verify if the settings appear in backup schedules.
Finally, you must log in as a network administrator and verify that your custom backup schedule appears in your Prime Mover backup schedule settings.
Go to Prime Mover PRO -> Toolbox -> Under “Backup schedule,” you should see your custom backup schedule, which is ready to use.
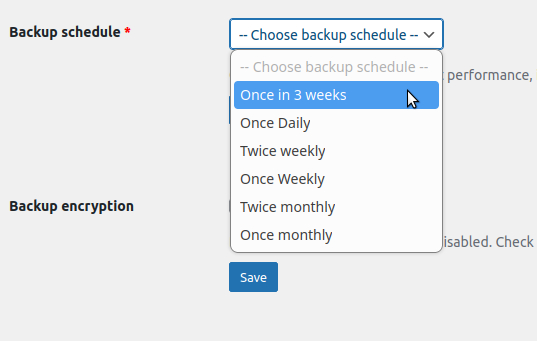
As you can see, the new custom backup schedule, “Once in 3 weeks,” has been added. This implies that you have added this schedule correctly.
Important note about the custom backup schedule
Make sure this custom backup schedule is not removed from your wp-config.php. Otherwise, your automatic backup won’t run anymore if this is not available.
Need help?
Please get in touch with our technical support team if you need help adding a custom backup schedule. Thank you!
Last updated: January 11, 2025