Scope
This step applies only to WordPress multisites, and if you are using the Prime Mover plugin version 2.0.7 or later (to restore the package to a main site).
These are straightforward steps to create a fresh WordPress multisite installation with a specific network or super administrator email, as recommended by the Prime Mover plugin.
[Optional] Step 1. Create a new WordPress multisite installation
Prime Mover plugin already checks if your multisite can be considered new. “New” means that your multisite passed the following initial checks before a main site migration with user differences:
- You only have the main site as your only site (no other subsites, etc.)
- There is only one super or network administrator.
- There is only one WordPress user in the multisite, and that is the super/network administrator.
Prime Mover plugin checks this because it does not make sense to reset an already working and large multisite installation (which already has many users or sites).
Since this step is optional, you can skip it if your multisite is already brand new, as creating a new multisite installation may take some time.
But if you need to create a brand new WordPress multisite, you can do the following steps:
- Drop your existing WordPress multisite database and create a new blank database.
- Delete your multisite configurations in wp-config.php and .htaccess (or some other server configs as applicable).
- Proceed with the classic WordPress installation and make sure to use the recommended target email address as the administrator.
- At this point, you now have a fresh WordPress installation using the specified/target email address as administrator. You can convert this site into a multisite by following the steps outlined by WordPress. You should use the same recommended target email as the network admin email.
Step 2. Network deactivate Prime Mover plugin and PRO license (if using PRO version)
If the Prime Mover plugin is still network-activated at this point, please network-deactivate the plugin first. If you are using a license for your main site, please temporarily deactivate the license by going to Prime Mover PRO -> Account and then deactivating the license.
Step 3. Change the network administrator’s email to the recommended one
If you have skipped Step 1, you need to update the current network administrator’s email address to the recommended one, as verified by the Prime Mover plugin.
- Install and network activate the Better Search Replace plugin.
- Go to Users -> All Users.
- Take note of the email address of the existing network/super administrator.
- Go to the main site WordPress admin dashboard.
- Go to Tools -> Better Search Replace.
- Enter the existing administrator email in “Search for.”
- Enter the target administrator’s email in “Replace with.”
- Under “Select tables,” select all of them.
- Uncheck “Run as dry run“. This is what it looks like so far:
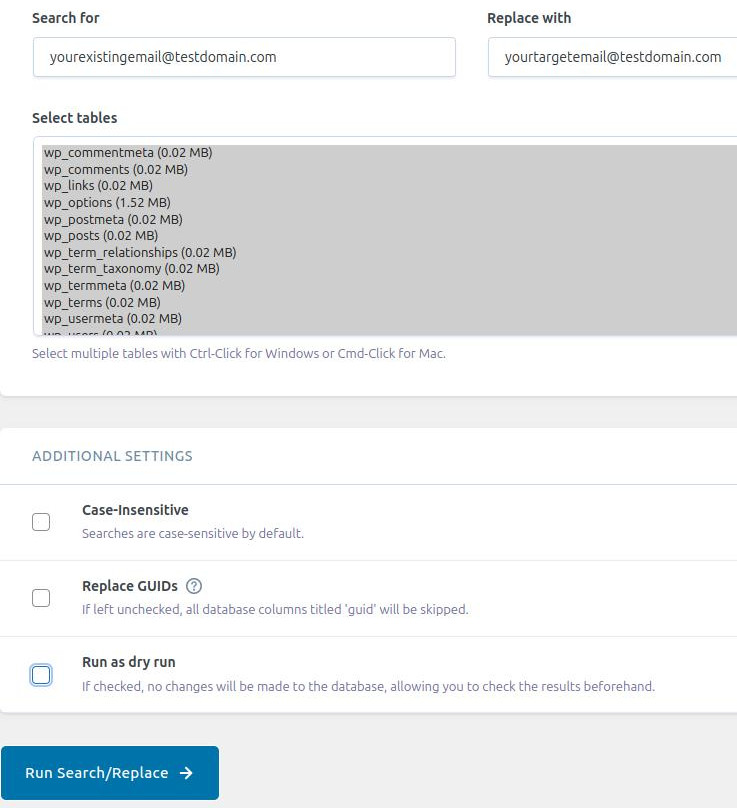
- Finally, click the “Run Search/Replace” button.
- Done.
- Network deactivate the “Better Search Replace” plugin.
Step 4. Reset Freemius data
To complete the reset procedure, you also need to reset Freemius data. This will prevent problems with activating the PRO license or Prime Mover plugin in cases where you have changed the network administrator’s email.
To reset Freemius data, please follow these steps.
Step 5. Network activate Prime Mover plugin (and activate PRO version if license is required)
Finally, on this point, you can safely network activate the Prime Mover plugin and activate the license on your main site. You can then try re-restoring the package as you originally did, and there should be no more warnings; the restore will then be processed until completion.