Scope: Prime Mover Free / Pro version
IMPORTANT : If you are using Prime Mover Pro for the first-time , please read this get started guide first.
This tutorial applies for both Prime Mover Free and Pro Version. This teach you how to migrate your WordPress multisite sub-site installation to single-site installation. The target site installation could reside in a different server or your localhost.
Exporting a package
- Install the latest version of Prime Mover plugin.
- Login as network administrator and network activate.
- Optionally opt-in to Freemius notifications.
- Go to Network Sites.
- Search the sub-site that you would like to export.
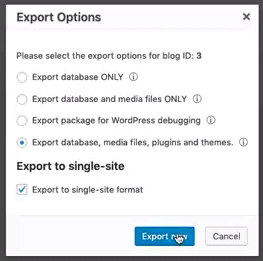
- Select appropriate export options.
- Make sure Export to single-site format is checked.

- Click Export Now. Wait until the export process is completed. Do not close or refresh the window.
Restore package in single-site
- In the target site, reset the WordPress database so it became like a fresh WordPress installation. You can use plugin like WordPress Reset to do this. Take note that this deletes the target site database, make a backup if this is still useful to you.
- Optionally you can clear the uploads directory so it the old and new media files will not be mixed.
- Activate latest version of Prime Mover plugin. This should be exactly same version as the one used in your multisite.
- Optionally opt-in to Freemius notifications.
- Go to Tools – Migration Tools.
- Click Import button.
- Browse to the exported package to upload it.
- Prime Mover analyzes the package and needs confirmation from you to proceed.
- Once the import started, there is no going back. You need to wait until this process is completed.
- Optionally you need to re-save permalinks if needed to resolved 404 errors on some pages (if you see it).
Was this article helpful?
YesNo