Scope: Prime Mover Free / Pro version
The problem
OK, supposing you already exported a site using Prime Mover and ended up with a large package size. Package size is somewhat of a relative figure. It varies from user to user as it depends entirely on your upload speed connection.
If your package size is 350 MB, it will appear large if your browser upload speed is only 64 kbps, as it takes a lot of time to upload this package.
On the other hand, if you have a 1 GB package or even 3 GB but you have a 500 MBPS upload speed or even higher, the uploading experience is a piece of cake. But it’s a different story when you upload this size on a 500 kbps slow DSL.
So, the definition of a large package depends on the upload connection speed. The longer it takes to upload, the larger the package problem.
The clue to this problem: The time it takes to upload
When you first attempt to import /upload, Prime Mover analyzes resources that checks the package type, encryption status (if encrypted), etc.. Then, a heads-up dialog pops up. It looks like this:
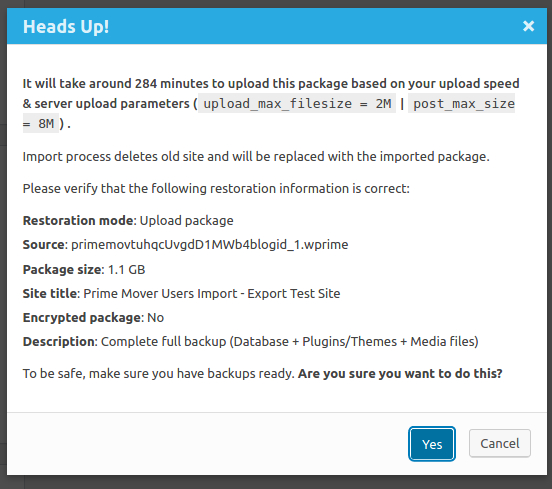
In this process, Prime Mover automatically computes the time to upload for which in this example it takes 284 minutes! This is almost 5 hours! This is because the upload connection speed of where that screenshot is taken is very slow.
In cases like this, it is not advisable to proceed with the upload via Prime Mover’s default upload functionality. It will take long hours, and a lot of things can happen. Think about internet disconnection, browser lags, server errors, etc. Your browser cannot handle these things easily because they can be random.
Why can it be slow aside from my connection?
One reason browser uploads via Prime Mover are slow is that we intentionally delay them in “between chunks.” For example, a large upload is broken down into 10 MB chunks, and after uploading each chunk, Prime Mover throttles (pauses a bit) and then resumes uploads.
This is done to avoid a bigger problem—accidentally launching DOS (Denial of Service) attacks on the server or putting a bigger load on the server. Throttling can help resolve this issue.
This is usually tolerable and advisable for smaller packages. But there is a better solution for bigger packages.
Solution: Manually upload via FTP/SFTP/SCP/Cpanel File Manager
The recommended strategy is to upload the WPRIME package to your target site’s Prime Mover export directory. Using tools that do not depend on your browser or server limitations would be best. These are your SFTP/FTP client, SCP (SSH copy), or traditional cPanel File manager (or Plesk manager in some servers).
cPanel file manager is straightforward to use. If you don’t have cPanel, you can use SFTP (which is more secure than FTP). There are a lot of free tools like Filezilla that support SFTP.
If you’re a bit techie and know SCP (command-line SSH copy), this is so much better. It is because CLI uploading seems to be the fastest to me. If you don’t have any of these tools, you can use FTP as a last resort. It is very strange for a hosting company not to offer any uploading solutions. FTP should be there, at least.
The objective is to upload the package to the Prime Mover export directory. Once uploaded, you can restore it within WordPress admin. Simple, right? These are the steps.
Step 1. Know your target site Prime Mover export directory path.
- Log in to your WordPress admin. If your target site is a multisite, you need to be logged in as the network administrator.
- Once logged in, go to Prime Mover -> Packages if it is a single site. If it is a multisite, go to Network Admin first, then to Prime Mover -> Packages.
- If your target site is a single site, this is what it looks like.
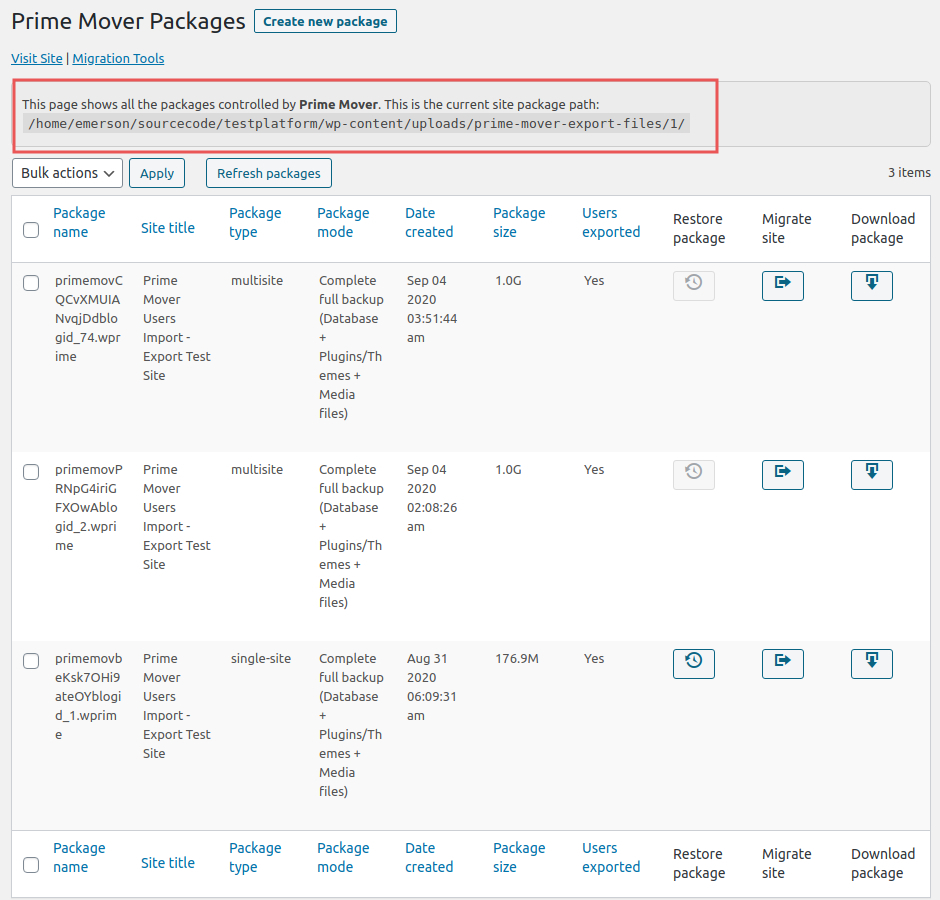
The one enclosed in the red box shows your target site Prime Mover export path. e.g.
/home/emerson/sourcecode/testplatform/wp-content/uploads/prime-mover-export-files/1/
If your target site is a multisite, things will be slightly different. You need to specify the subsite blog ID first, then press enter key. It will then load the subsite package management page. This is what it looks like:
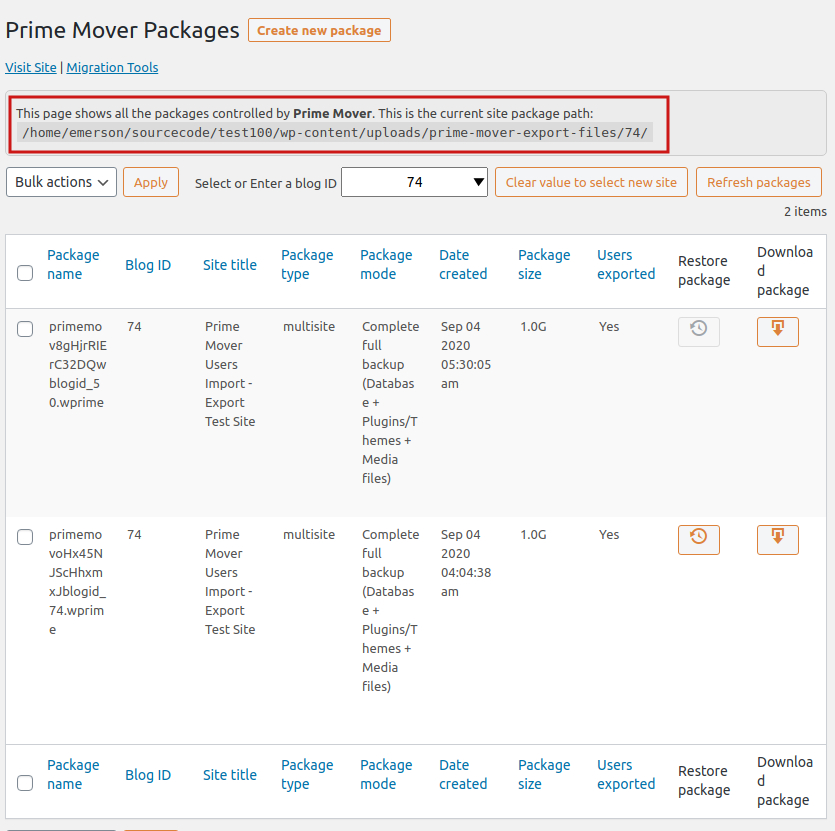
If you have noticed, there is a blog ID field where you need to enter or select the subsite’s blog ID. This is required to load the correct package management page of the subsite. Each subsite should have its own export directory path and package management page. Make sure you load this one by providing the correct blog ID.
Once it’s loaded, you should be able to retrieve the export directory path of this subsite. This is how it looks in this example:
/home/emerson/sourcecode/test100/wp-content/uploads/prime-mover-export-files/74/
This is where you need to upload your WPRIME package.
Step 2. Refresh the packages
Once it’s uploaded, click the “Refresh packages” button, and you should be able to see the package. Carefully examine the package file name and all meta details to make sure they are correct and that you have uploaded them correctly.
Step3. Restore the package.
Once it’s refreshed and you are sure the package is correct, you are ready to restore it. Click the “Restore package” button to start the migration or restoration of the package to the target site. This can take some time, depending on the size of the package and the speed of the server.
If you cannot see the package, then it means:
- You upload it to the wrong path. Please review the path again.
- The package might be corrupted (if you are sure it’s uploaded to the correct path). Try re-downloading the package from your source site via SFTP and re-upload it again to your target site export directory.
If you see the package but you cannot restore it (the restore button is disabled), then it means:
- You created the wrong package for your target site. For example, you created a single-site package at the source site but restored it to a multisite. In this case, you should create a multisite package.
- Or you can create a multisite package and restore it to a single site (you should create a single-site package instead).
- Or you created a multisite package for blog ID 5 but restored it to blog ID 7 (ID mismatch, not allowed). You should create a multisite package for blog ID 5 and restore it to the target subsite with blog ID 5.
- The package is encrypted, and you are using the free version. (This requires a PRO version).
You will always know why the Restore package button is disabled. Click the “restore package” button; the title attribute will show the reasons. For example:

Something isn’t working?
Please get in touch with our technical support here.
Last updated: November 17, 2024