Background
UPDATE (March 9, 2021): Since Prime Mover 1.2.9, you can now freely use single-site license in multisite without the need of testing or any complications. If you are still using older version of Prime Mover, please update to at least version 1.2.9 so you won’t have any issues.
This article is already outdated and no longer applies for Prime Mover 1.2.9+.
===================================================
For details on why this is the case, please read this guide. This tutorial is written with exception to those that already have single-site license and want to try out some multisite features.
Exceptions
Some of the users might already subscribe to a free trial with single-site license with intention to test Prime Mover Pro in WordPress multisite.
You can also use this tutorial if you already subscribed to a single-site license (not a free trial anymore). And then want to try out the features on a multisite.
There is a way to test Prime Mover Pro features with a single-site license in a multisite environment. The objective of this quick guide to migrate a subsite from the source multisite to another target multisite.
Step 1: Activate single-site license in multisite
- Go to your email and find the subject: “Your free 14-day trial started” or similar new account subscription emails from Freemius. In that email, there is a link to Freemius site with your own login credentials.
- Use those credentials to login and there and retrieve your license key.
- Download latest Prime Mover Pro version from your Freemius account. Do not use free version from WordPress.org.
- Install and upload Prime Mover Pro version in your source multisite (this is the origin site that you have some sub-site to migrate).
- Prime Mover Pro will ask for a license key, copy and paste the license key obtained in previous steps.
- Unchecked “Activate license on all sites in the network.”
- From the list of sub-sites , select ONLY one sub-site that you want to migrate.
- Finally click “Agree and activate license.”

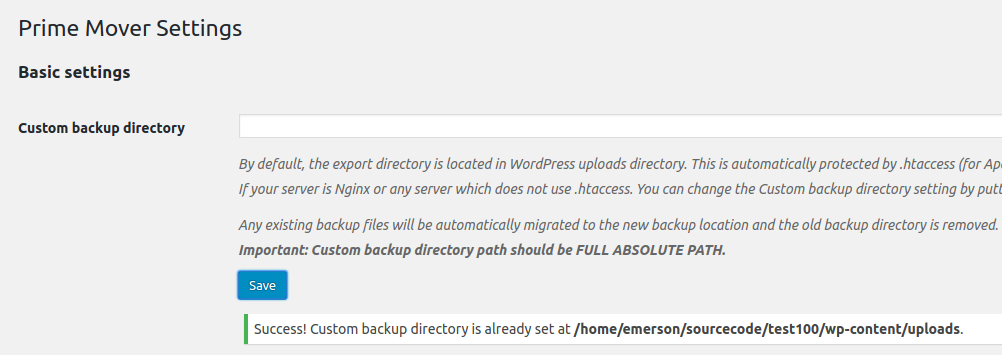
Step 2: Make sure export path is set to default uploads directory
- Go to Prime Mover – Settings in Network Admin. You should able to access this settings page if you have successfully activated license key in previous steps.
- Make sure the uploads directory is set to default WordPress uploads directory (not to any custom path). This is already set by default but it is important to check just to be sure.
- If it is already in default, you don’t need to change anything else and proceed to next step.
- If it is not in default, simply delete the value (empty it) and click Save. It will reset back to defaults (pointing to uploads directory of WordPress).
Step 3: Generate export package
- Go to Network Admin -> Sites.
- Find the sub-site you want to migrate. You can use the search box and search using the sub-site site title or eve blog ID.
- Once you find the sub-site, click its corresponding export button.
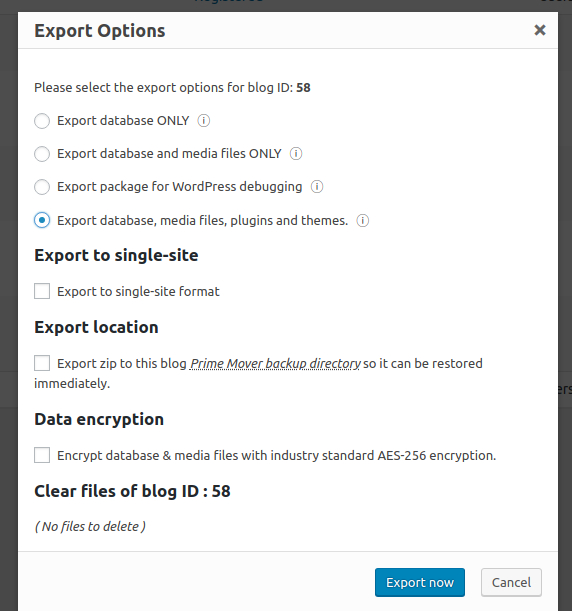
- Export dialog menu will pop-up.
- Select the export options. In this example, we want to migrate the entire sub-site resources (plugins + themes + database + media files).
- Unchecked all check boxes.
- Finally click Export now button.
- Please wait until the export is done.
- Once done, it will download to your local computer downloads directory. Double check that its there.
Step 4: Upload the package to your target site WordPress root directory
- Now you have the exported package in your local Desktop.
- Upload it to your target site WordPress root directory. For fastest and secure uploading, use SFTP or SCP
- Take note of the file name after you have uploaded it to the WordPress root directory. The resulting URL should be like this: https://yourtargetsite.com/thisisyourpackage.wprime
Example of the package uploaded in your WordPress root directory:

Now this is why you should use multisite license (and not single-site license). It is because this step is unnecessary with multisite license. You can simply generate authorization keys and the target site will directly download from the source site. No need to download package and then upload to remote target site. It saves you time.
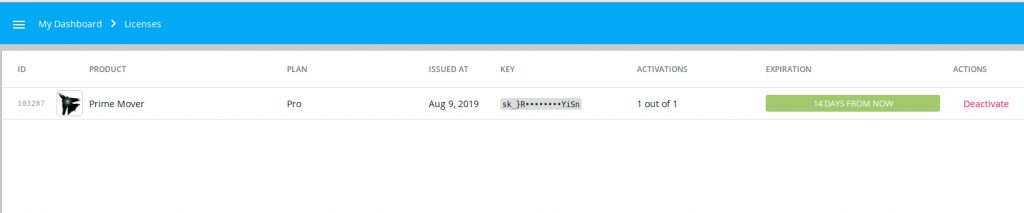
Step 5: Deactivate License for the current multisite
- You can simply sign-in again to your Freemius account (that you have already done earlier).
- Go to license section and click “Deactivate”.
- Refresh the page, it should show “0 out of 1“. It means no site is currently using that single-site license.
- This license key is now free to be use to your another multisite network.
Step 6: Install and activate latest Prime Mover Pro version on target site
- Download and activate latest Prime Mover Pro version at the target multisite where you want the site to be migrated. This should be the same version as the one used in the source multisite.
- Freemius will ask for a license key that you need to paste to the license key box. Use the license key that is now free to use.
- Unchecked “Activate license on all sites in the network.“
- Check that sub-site that is the target of the migration (ONLY one).
- Finally click “Agree and Activate license“.
- Prime Mover Pro will be activated.
Step 7: Restore the package to the target site
- Go to Network admin -> Sites and find the site that is the target
- Click Restore button.
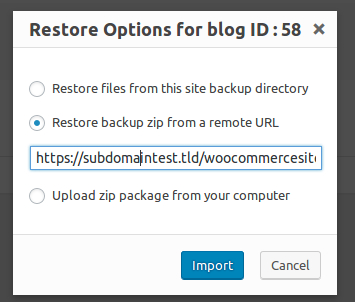
- Restore dialog will pop-up.
- Check Restore backup from a remote URL
- Paste the URL which is the path to the export package. e.g. https://yourtargetsite.com/thisisyourpackage.wprime
- Finally click Import and you are done. After you confirm that the import package is correct, you can wait until the restoration is completed.
- The site is now migrated.
Note: We have tested the accuracy of this tutorial and it is proven to work with version 1.0.3-beta +. If you are using version Prime Mover Pro 1.0.2 (whether on free trial or regular subscription) and want to try out this procedure, contact us and we will provide you a copy of version 1.0.3-beta. This is just in case version 1.0.3 is not yet released.