Scope: Prime Mover Pro
Background
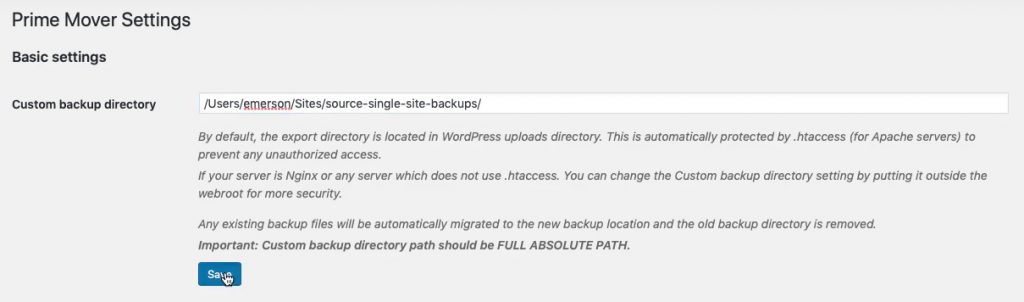
Custom backup directory is one of the first settings for Prime Mover Pro that you would like to configure.
By default, this path is set to WordPress uploads directory for both free and pro version of Prime Mover. Prime Mover automatically detects if it has both read and write permission to this directory. If it does not write permission, the plugin will not be activated and you cannot use the plugin.
This directory is used when Prime Mover creates backup / migration packages. Temporary files will be stored in this directory as the export is ongoing. For example, database are dump to this directory, media / plugin / theme files will be copied from the plugins directory to this custom directory.
This directory will store WPRIME packages that will be used when you restore a site from the backup. The nice thing about Prime Mover Pro is that it can take snapshot of your site, for example if you want to create a backup before you do major changes in your site like major plugin updates.
When something goes wrong, you can simply deactivate all plugins except Prime Mover Pro and then restore your latest site backup from the custom backup directory. After that everything should goes back to normal.
Security – move your custom backup directory beyond public access
As you have learned earlier, the directory will be used to store Prime Mover packages. It’s important that you move this backup directory beyond public access.
By default, this is protected with .htaccess which will work only for Apache servers. The generated file name is hard to guess though, but you need to make sure that you will move this directory beyond public access. This is to make sure no one can publicly access your backups.
For example, you should move this above public_html directory. Simply update the path and click Save.
Let’s assume your WordPress public html root path is /home/mysite/public_html/
Then you might want to create a temporary folder named as “myprimemover-backups” in the mysite folder which is now above public_html.
Therefore the new custom backup directory path that you need to save is: /home/mysite/myprimemover-backups/
This tutorial has a video on how this is done.
Prime Mover Log Files ,Debug Log , Error Logs
Your custom backup directory is where all log files, debug log and error log files related to Prime Mover will be stored.
You don’t need to worry about them as you can easily delete them in: Prime Mover – Advance – Clear logs
Take note that one you cleared the log, there is no way to get it back.
Moving backup path – best practices
Using the custom backup directory setting, you can easily move your backup path to any path you specify. When you move backup path, take note that it also automatically copies all packages to the new path.
If your backup directory is so BIG, your server might reach a timeout as the plugin is copying files. You will know this because you can get errors when you save this in the backend.
To avoid this issue, you can do the following:
- Check the size of your backup directory first. You can get this info in Prime Mover – Settings – Backup management – Backup stats.
- Click “Compute backup directory size“.
- It will give you the total size of your backup directory.
- Usually if you are on the shared hosting, you might need to delete some backups if its beyond 100MB, to make sure your server does not reach limits.
- If you are on a dedicated hosting with flexible timeout, you can move like 100MB to 500MB or even 1GB if your server can support it.
The key is to delete unneeded backups before moving your backup directory, so it appears manageable.
Deleting package in custom backup directory
Prime Mover has a lot of built-in tools to manage your custom backup directory within WordPress admin. There should be no need to login to SSH to delete files for example.
If you want to delete some backup:
- Go to Tools – Migration
- Click Import button.
- In Restore Options dialog, click Restore files from this site backup directory
- It will show a list of active backups in your backup directory.
- Mouse over the package link until you see package description. Use this description what files to delete as it shows when the backup is created ,etc. (e.g. you might want to delete older backups)
- Use the delete icon to delete any of the backup. See screenshot below:
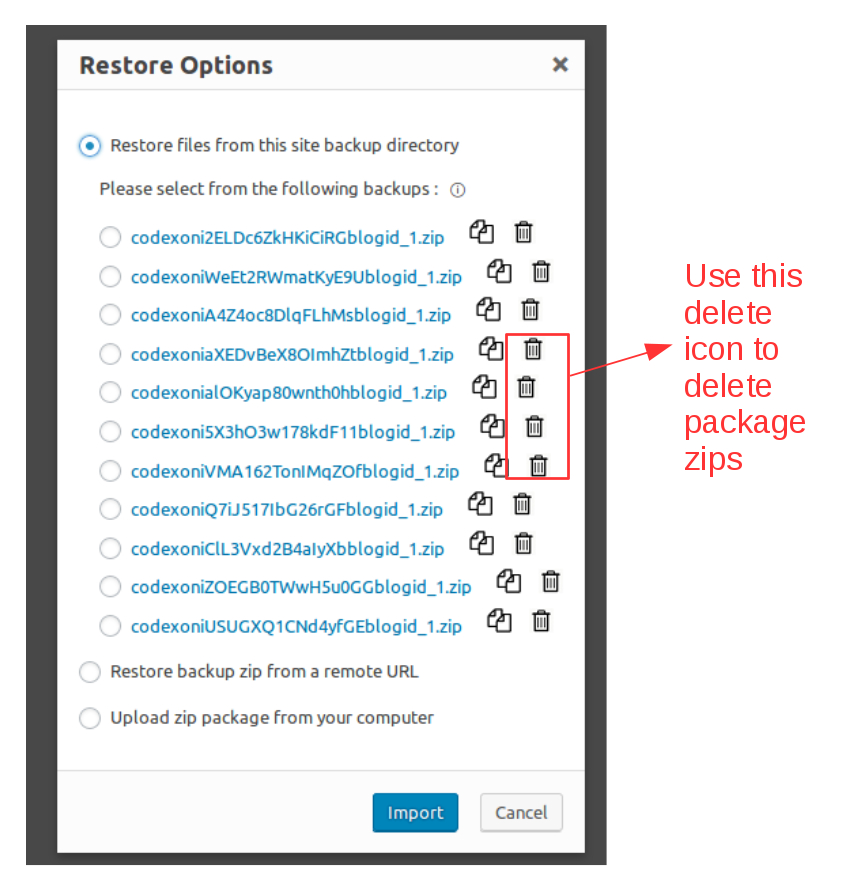
NOTE: This screenshot is taken before Prime Mover 1.1.5 which uses ZIP archiving format. Since Prime Mover 1.1.5, zip is no longer used, you should be able to see WPRIME archives. Take note that ZIP package works only for backward compatibility reasons. This is the case when the backup is created before version 1.1.5 is released.
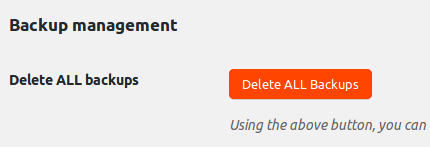
Delete all files in custom backup directory
If you are sure you don’t need ALL of your backups and logs, you can delete this in one button.
- Go to Prime Mover
- Go to Settings
- Scroll down to “Backup management”
- Click Delete ALL backups button.