Scope
Applies to: This tutorial only applies if you have an unlimited license plan for your multisite network.
Objective
The goal of this tutorial is to activate the license for subsites in your multisite network successfully. Any new sites added will have a license automatically activated, so you won’t need to activate a license for each new site.
Step 1 – Make sure you are using the latest Prime Mover PRO version
Using the latest PRO version ensures you always have the most stable version of the Prime Mover plugin across your multisite. You can always download the latest PRO version inside your Freemius account.
In addition, the latest PRO version always ships with the latest Freemius licensing library, so it includes all bug and performance fixes related to license activation across your multisites.
Step 2 – Network deactivate Prime Mover PRO and delete all FREE versions
As a prerequisite for the next step, you need to network deactivate Prime Mover PRO. If you have the Prime Mover FREE version installed in your /wp-content/plugins/, it is recommended to delete it so you have only the PRO version in your plugins directory. Deleting the FREE version ensures it cannot be accidentally network-activated later. The FREE version does not have a license activation screen, so you cannot enter a license key.
Step 3 – Reset Freemius data to fix possible errors
Some of your subsites might not have a license activated because of other plugins or an incomplete installation, which can corrupt their Freemius data. Please follow these steps to reset Freemius data.
Note that you need to network-deactivate the Prime Mover PRO plugin during the reset process.[
Step 4 – Set server timeout as high as possible for large multisites
If your multisite network has many subsites (e.g., more than 50 or hundreds, even thousands), it is recommended to set your server timeout as high as possible to avoid timeouts when activating the license for all subsites.
The timeout depends on the size of your site, but if you have thousands of sites, you can temporarily increase the timeout to about 60 minutes to be sure, then bring it back to the normal timeout once all sites have a license activated.
There is a separate tutorial on this topic, which you can read here for details.
Step 5 – Network activate Prime Mover PRO and enter the license key
Now here comes the most important part: once all the above requirements are met, you can network activate Prime Mover PRO and enter the license key.
Right after network activating the PRO version inside your multisite network admin, you should see this screen:
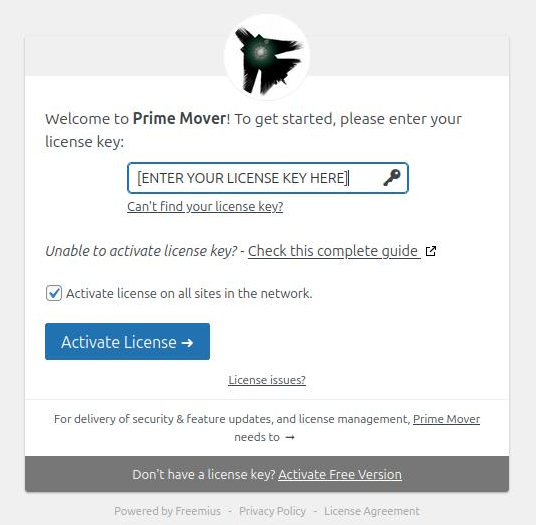
You need to set two essential things in that dialog:
- Your Prime Mover valid and active license key.
- Make sure you checked “Activate license on all sites in the network.“
After that, click the “Activate license” button and wait for the license to activate across all your subsites. This can take some time if your multisite is very large, but it should not have an issue if you already set the timeout to high settings in the previous steps.
That’s it! It’s done – you can check if you have truly activated the PRO version on your site using this tutorial. And when you add new sites, it will automatically activate the license on them, saving you time by avoiding per-site activation.
NOTE: In some Freemius libraries, Freemius limits network license activation to the first 1000-sites only to avoid hitting the timeout and corrupting the license activation data. If your site exceeds 1000 sites, you now need to manually activate the license on each of them. Please contact us so we can coordinate with the Freemius team to see if there is a way to mass-activate all sites if manual activation is not feasible.