Background
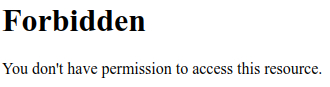
When you get a 403 forbidden error after upgrade to Prime Mover PRO version – this is because of ModSecurity module enabled in your site. This is a security module that is used by hosting companies to protect your site. However – this event is a false positive.
Good news – the solution is very easy.
Step 1 – Navigate to /wp-admin or /wp-admin/network page
Usually after purchase – you will be redirected back to your site admin page via a URL that looks like this:
https://yoursite.tld/wp-admin/admin.php?fs_action=prime-mover_activate_new&plugin_id=1234&page=migration-panel-settings-account&_wpnonce=12345
This is where the Modsecurity returns a 403 forbidden status. The solution is change the address of the URL of your address bar to simply go to /wp-admin/ page, e.g
https://yoursite.tld/wp-admin/
If your site is a multisite – simply go to network admin dashboard:
https://yoursite.tld/wp-admin/network/
This will load the index page of your WordPress admin dashboard (for single site) and network admin dashboard (if multisite). You should no longer see 403 forbidden errors or other errors on this page.
Step 2 – Deactivate Prime Mover FREE version
After upgrading from Prime Mover FREE to PRO, the FREE version is still activated in your site. You will need to deactivate this plugin. Simply go to plugins page and deactivate it.
In multisite – you will need to network deactivate the FREE version.
Step 3 – Uninstall and delete Prime Mover FREE version
After deactivating the plugin – uninstall it by clicking the red delete link of the Prime Mover plugin in your plugin page:

Step 4 – Download the latest Prime Mover PRO
- Login to your Freemius buyer account.
- Go to downloads tab and download latest Prime Mover PRO zip to your Desktop.
- Don’t unzip because you will need this to be installed to your site.
Step 5 – Install and activate Prime Mover PRO
- Login to your WordPress site.
- Install the plugin by uploading the zip in WordPress admin -> Plugins -> Add New or WordPress Network admin -> Plugins (if multisite) -> Add New
- Once installed – activate the plugin (network activate if on multisite).
- You should be able to see the license key form page.
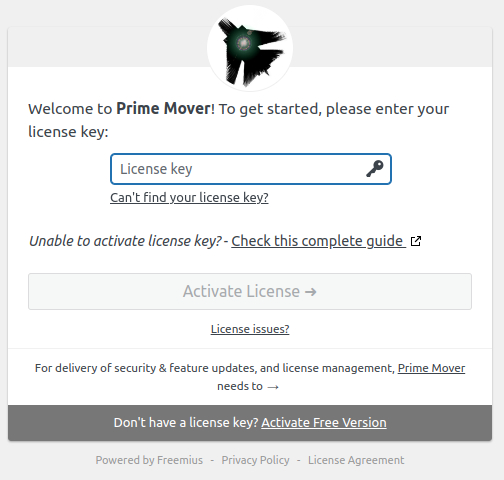
Step 6 – Enter your license key
Finally you will need to enter your license key. You can find this in your Freemius account -> License section. Once entered click activate license button.
If you are unable to activate license in because it says that the license key is already utilized – please do the following:
- Deactivate license key inside your Freemius account.
- Activate license again inside your WordPress site. If you are activating license in a multisite for only some sites – please read this tutorial.
Step 7 – Congratulations – PRO features are now activated!
You will know the PRO features are activated when you can now start using them in the Settings page or you will always see the Prime Mover PRO label in your plugins dashboard.
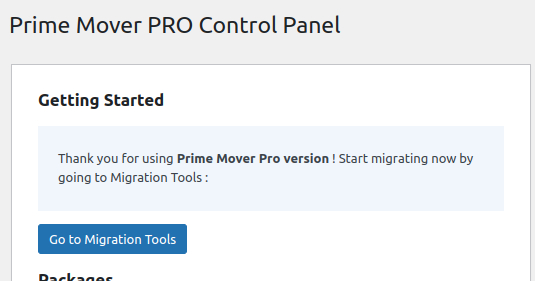
For example – you will see “Prime Mover PRO Control Panel” instead of “Prime Mover Control Panel“.
Do you have issues activating licenses?
Please contact technical support and provide us the details.