Scope: Prime Mover Free / Pro version
IMPORTANT: If you are using Prime Mover Pro for the first time, please read this get-started guide first.
This tutorial applies to both Prime Mover Free and Pro Versions. It teaches you how to migrate your WordPress multisite subsite installation to a single-site installation. The target site installation could reside on a different server or your local host.
Exporting a package
- Install the latest version of the Prime Mover plugin.
- Log in as a network administrator and activate the plugin in the network.
- Optionally opt-in to Freemius notifications.
- Go to Network Admin -> Sites -> All Sites.
- Search the sub-site that you would like to export.
- Click the export button – and the export dialog will pop up.
- Select appropriate export options. If you want to make a complete site migration (which means including the database, plugins, themes, and media files), make sure to select “Export database, media files, plugins, and themes.”
- Under “Export type,” ensure the Export to single-site format is checked.
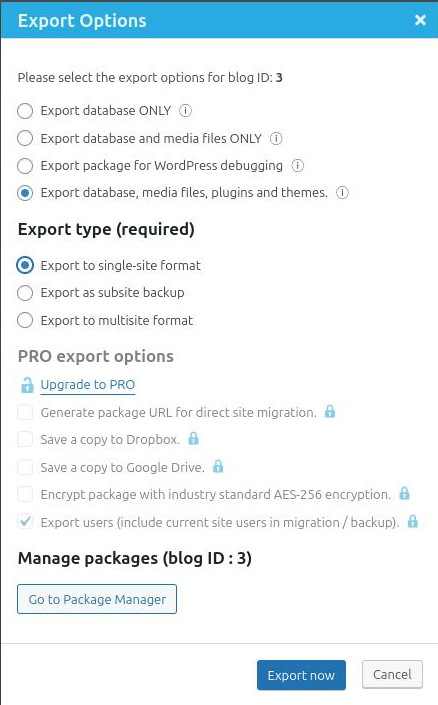
- Click Export Now. Wait until the export process is completed. Do not close or refresh the window.
- Download the package to your Desktop. For best results and to avoid hosting timeout when downloading your package (especially if it’s large), please download via SFTP or using your hosting file manager.
To summarize, the above screenshot example migrates the subsite with blog ID 3 to a standalone WordPress single-site installation.
Restore package in single-site
- In the target site, reset the WordPress database so it becomes like a fresh WordPress installation. You can use a plugin like WordPress Reset to do this. Note that this deletes the target site database; make a backup if this is still useful to you.
- Optionally, you can entirely clear the uploads directory so that the old and new media files will not be mixed.
- Activate the latest version of the Prime Mover plugin. This should be the exact same version as the one used in your multisite.
- Optionally opt-in to Freemius notifications.
- Go to Tools – Migration Tools.
- Click the Import button.
- Browse to the exported package to upload it.
- Prime Mover analyzes the package and needs confirmation from you before proceeding.
- Once the import starts, there is no going back. You must wait until this process is completed.
- Optionally, once the restore is completed, you need to re-save permalinks if necessary to resolve 404 errors on some pages (if you see them).
If your package is huge to restore via default browser upload:
- Ensure your package is completely downloaded to your Desktop (from the multisite source site).
- You can restore your package via the package manager. This requires uploading your package from your Desktop to your target site’s Prime Mover export directory.
- Finally, once the package is uploaded, you can safely restore it via the Package manager on the target site.
- Wait until the restore is completely done. Then, you should have migrated your site to a single site.
Last updated: November 19, 2024
Was this article helpful?
YesNo