Scope: Prime Mover Free / Pro version
IMPORTANT: If you are using Prime Mover Pro for the first time, please read this get-started guide.
This tutorial illustrates how to migrate an existing sub-site in a multisite environment to another multisite environment. This tutorial applies to both Prime Mover Free and the Pro Version. The target site installation could reside on a different server, localhost, or even in the same multisite.
Before you export your multisite subsite
Please do the following before you export your subsite (in your source multisite):
- Set up your blank target subsite in a different or the same multisite. If your target subsite has not been created yet, it is best to do so before you export your source subsite.
- Now that you have created your blank subsite in your target multisite, please note the target subsite blog ID. Refer to this tutorial for instructions on obtaining the blog ID of the subsite. You will need this blog ID to correctly target your target multisite package later on in the examples.
Example #1: Migrate the same subsite to another multisite network
Description: For example, say you want to migrate a subsite with blog ID: 3 to another multisite environment on another server or hosting. The target subsite blog ID in another multisite is also 3.
Source multisite site:
- Install the latest version of the Prime Mover plugin.
- Log in as a network administrator and activate.
- Optionally opt in to Freemius notifications.
- Go to Network Sites.
- Search the sub-site that you would like to export.
- Select appropriate export options. For example, say you want to migrate the entire subsite (database, media files, plugins, themes) – the export dialog will look like this.
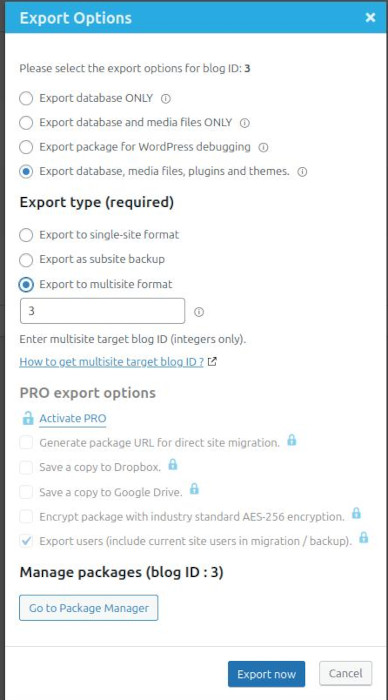
The most critical settings in the above export dialog are as follows: Specify that you need to export to a multisite package format (selecting “Export to multisite format“), specify the target subsite blog ID (Enter the multisite target blog ID).
- Finally, click Export Now. Wait until the export process is completed. Do not close or refresh the window.
- After completing export, you need to download your package to your local Desktop or laptop. Please double-check that the download process is complete, as some hosts cut off huge package downloads due to a timeout or server limitation. To make sure that you will be able to download the package at all times (regardless of whether your host implements a timeout or not). You need to download the package via SFTP/FTP. Downloading via cPanel or using your hosting file manager is also recommended if your host does not provide FTP access.
Example #2: Migrate the subsite to another multisite network with a different blog ID
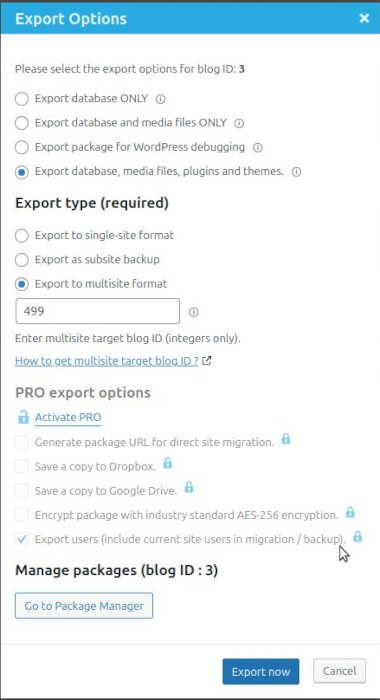
Description: In this example, say your original subsite blog ID is 3, but the freshly created blank subsite in the target multisite is blog ID 499. To make the correct package, you need to specify the correct blog ID in the export dialog.
Example #3: Migrate subsite to target multisite main site
Migrating a subsite to another multisite main site requires knowing the target main site blog ID. Most multisite main sites, however, use a blog ID of 1 (not all, so make sure to check this before creating an export).
For details, please refer to this tutorial: Migrate the subsite to the multisite main site. Please note that restoring a package to a multisite main site is a Pro feature. Therefore, ensure that you upgrade your plan to PRO before attempting to restore the package in your target multisite.
Example #4: Migrate your source site’s multisite main site to another multisite
Note: To export your source multisite main site, it requires a PRO version of the Prime Mover plugin. If you are still using the free version, you need to upgrade to the PRO version.
For details on this example, please refer to the complete tutorial on migrating your multisite main site to a subsite.
Restore Package
The restoration process is the same regardless of what export methods you’ve used. In summary, these are as follows:
- Install the latest version of the Prime Mover plugin. It should be the same version as the one used to create the export package.
- Log in as a network administrator and activate the Prime Mover plugin in the network.
- Optionally opt in to Freemius notifications.
- Go to Network Sites.
- Search the sub-site that you would like to be restored.
- Click the Restore button.
- Browse to the exported package.
- Prime Mover validates the exported package (e.g., analyzes the blog ID vs the target blog ID).
- If it matches, Prime Mover asks you to confirm the restoration.
- If you proceed, wait until the restoration process is completed. This process may take some time, depending on the size of the package.
Help! Mismatch import error!
A mismatch error is caused when you create a multisite package with an incorrect target blog ID. For example, if you restore your package (exported with a specified target blog ID of 5) to a blank subsite with a blog ID of 6. This mismatched blog ID between the source and target subsites prevents the package from being restored. There are a couple of easy solutions to this issue (whichever is possible):
- For FREE versions, you can re-create a new export (at the source site) targeting the correct target blog ID. Use this updated package to restore the subsite.
- If you are using the PRO version and the target subsite blog ID isn’t used by another existing subsite, you can create an empty/fresh/blank subsite with this target blog ID. For example, if you have created a package targeting blog ID 6, you can then create a blank subsite with the same blog ID. This is supported with the PRO version.
Last updated: June 16, 2025